")
")
AVR microcontrollers (MCUs) from Atmel are very popular in our region and are used by many beginners as well as experienced MCU programmers. These are 8-bit microcontrollers with high performance, relatively low power consumption, and a large number of peripherals. The Angry Bear Board (ABB) development board uses the ATmega328P MCU, which is also part of the popular Arduino UNO platform. ABB is a new version of the Mega Development Board 2. The functions of ABB are completely identical to the Mega Development Board 2. The main advantage of the new version is the connection via a USB-C connector, which is used for powering the board as well as for communication with the PC via the UART interface.
Basic features of the Angry Bear Board
- Power, programming, and communication via USB-C connector
- MCU frequency is 8MHz (option to add an external oscillator)
- Pre-programmed bootloader for uploading programs via the UART interface
- Compatibility with Arduino UNO – ability to connect various Arduino UNO Shields (e.g., Arduino Multifunction Shield)
- All ports are brought out - PORTB, PORTC, and PORTD
- Ability to use up to 8 LEDs or a 7-segment display connected to PORTB
- 8 buttons connected to PORTD
- Resistor trimmer connected to the AD converter input ADC0
- Ability to connect an analog signal via terminal block to the AD converter input ADC1
Technical specifications of the Angry Bear Board
| Microcontroller | ATmega328P |
|---|---|
| MCU Frequency | 8 MHz (internal oscillator) |
| Power supply | 5V (USB-C) |
| Operating voltage | 5V or 3.3V |
| Number of integrated LEDs | 8 (PORTB) |
| Number of integrated buttons | 8 (PORTD) |
| 7-segment display | yes (PORTB) |
| Reset button | yes |
| UART interface | yes (via USB-C) |
| UART indicator LEDs | 2 (RX and TX) |
Pinout map
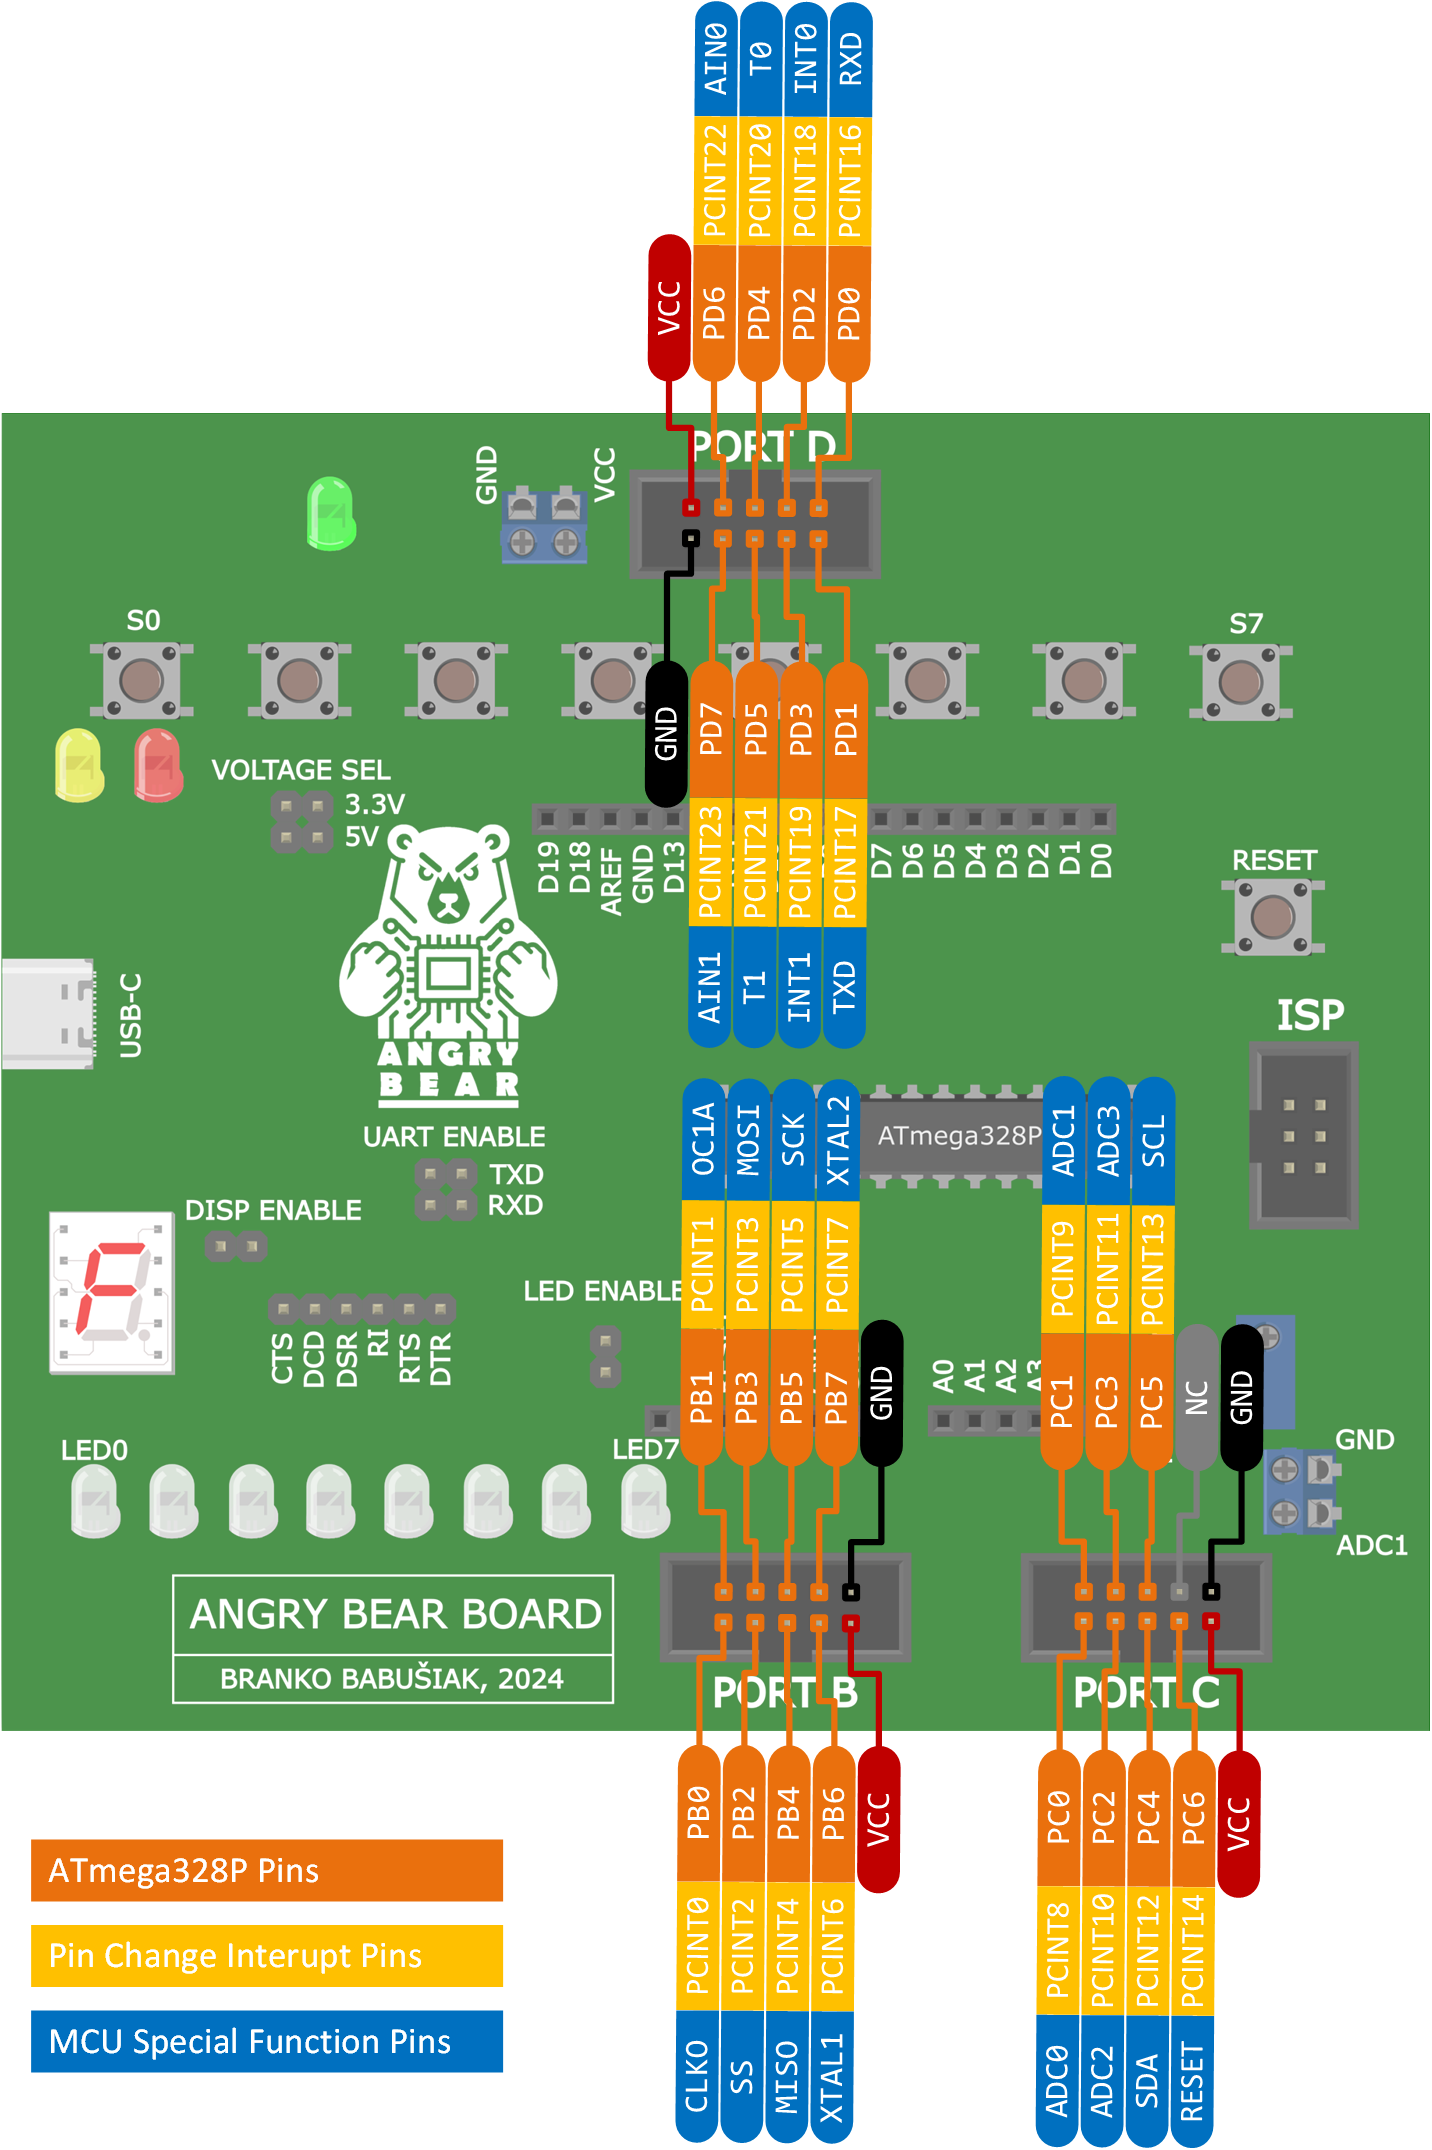 Pinout diagram of the Angry Bear Board (ABB).
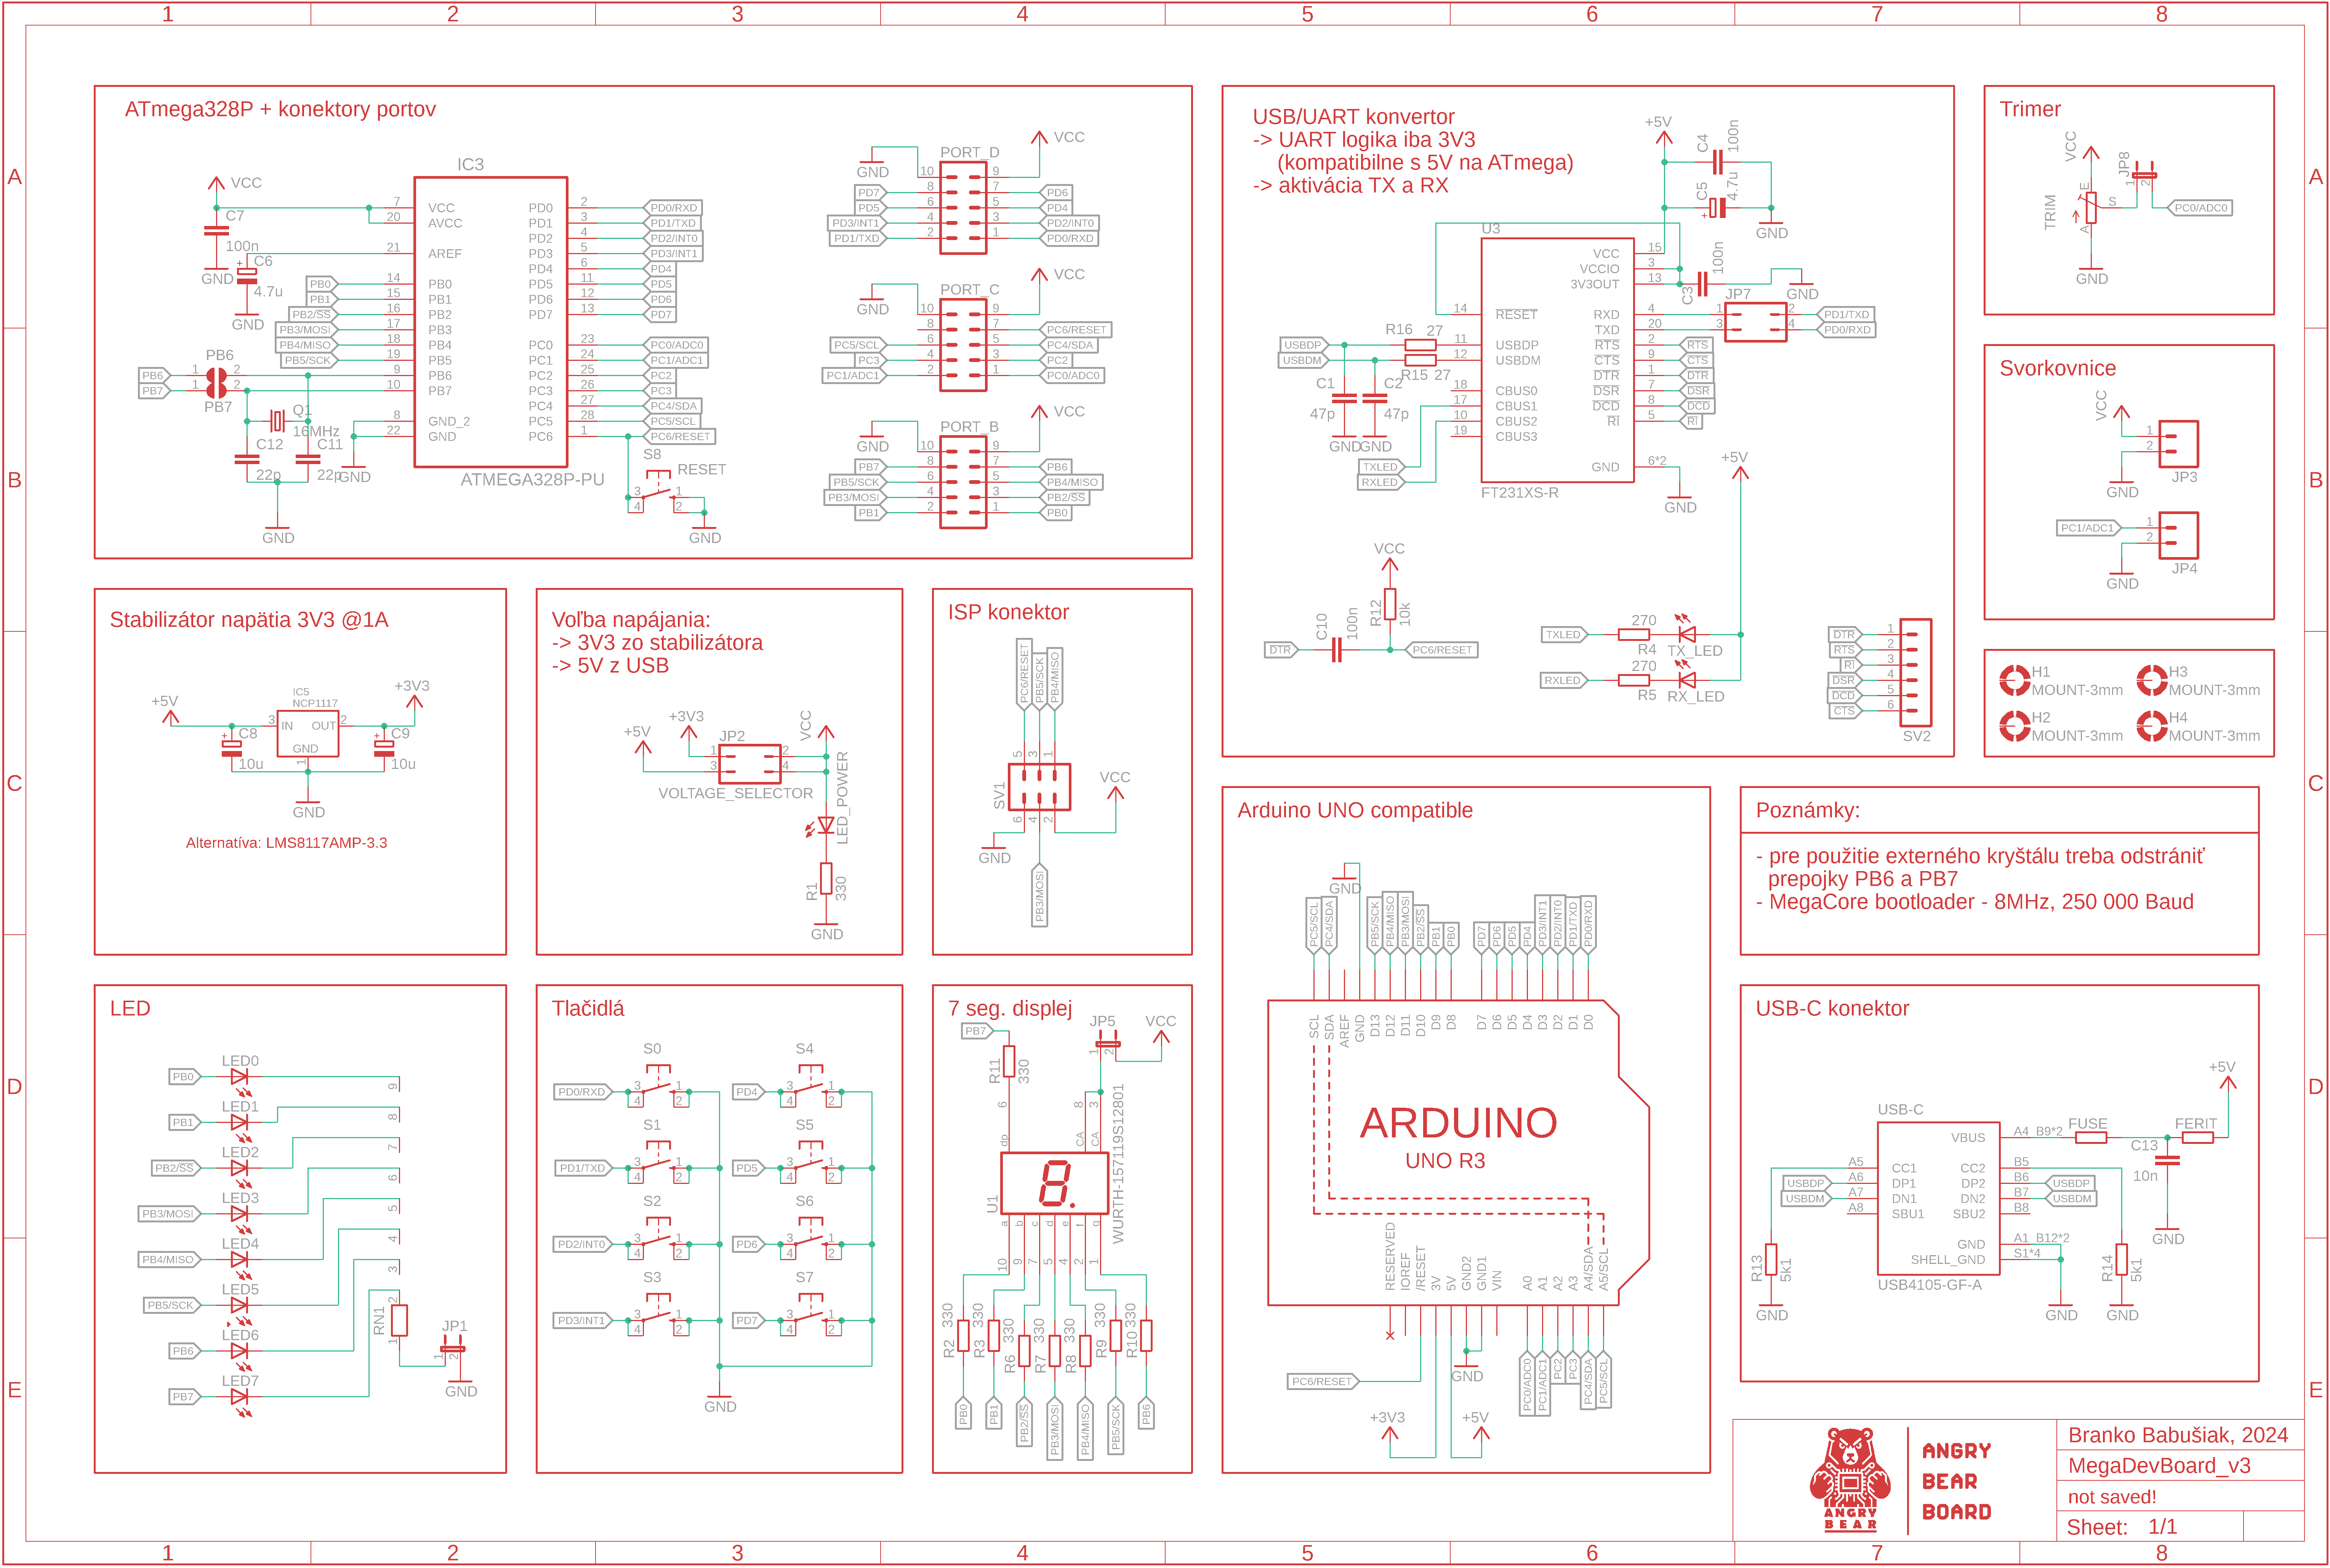
Electrical schematic diagram
Programming via USB-C
This method represents the most convenient way of programming because it does not require a programmer. The ABB board connects to the PC via a USB cable with a USB-C connector. This type of programming is possible thanks to the bootloader, which is already programmed in the ATmega328P. If such uploading does not work, it is necessary to first upload the bootloader via the ISP connector using a programmer (procedure is provided below).
The following conditions must be met when programming via USB:- Upload speed (Baudrate): 250,000 Baud
- Both jumpers on TXD and RXD (UART ENABLE) must be present.
Programming can be done, for example, through Microchip Studio (instructions here) or Arduino IDE (instructions here).
Programming via ISP
The ATmega328P microcontroller embedded in the ABB can be programmed via the ISP (In-System Programmer) connector using an Atmel ICE programmer, or the older AVR Dragon programmer, which is no longer manufactured.
Uploading the bootloader
The bootloader is necessary if we want to program the MCU via the UART interface. In the case of ABB, the UART interface is converted to a USB interface using the FT231 interface converter, so programming is possible via the USB-C connector. The ABB board has a preset internal oscillator of 8 MHz and a bootloader set to 250,000 Baud, 8 MHz. The bootloader can be uploaded via the ISP connector by running the programming application and selecting the appropriate option. The procedure for uploading the bootloader using the AVR Dragon programmer is as follows:
- Connect the AVR Dragon programmer to the PC and to the ABB board using the ISP connector.
- Start the programming application (for example, Microchip Studio).
- Select the ATmega328P microcontroller.
- In the tab for selecting the operation, choose Memories.
- In the Flash section, select the bootloader file (can be downloaded here).
- Upload the bootloader.
If the process is successful, the COM port will be displayed in the Device Manager. It is important to remember that in case of issues with the bootloader upload or if the USB interface does not work, it is necessary to re-upload the bootloader.
Frequently Asked Questions
- 1 What to do if the board is not recognized by the PC when connected via USB-C?
- 1 First, check if the board is correctly connected and the drivers are installed. If the issue persists, try re-uploading the bootloader via the ISP connector.
- 2 Can the ABB board be powered by an external power source?
- 2 Yes, the board can be powered either via the USB-C connector or an external 5V power supply.
- 3 How to upload a program to the ABB board using the Arduino IDE?
- 3 The process is the same as for the Arduino UNO. Connect the ABB board via USB-C to the PC, open the Arduino IDE, select the correct COM port, and click on the Upload button.